48-Hour SEO Specialist Mastery Plan
SEO Specialist · 2 Years Experience · Free Tools Only

Link Building · Technical SEO · On-Page · Local SEO · Analytics · Job Prep

HR 0–6
Setup & Audit
HR 6–16
Link Building ⭐
HR 16–24
Technical SEO
HR 24–32
On-Page & Local
HR 32–48
Analytics & Jobs
PHASE 0
Setup Your Free Toolkit
HOURS 0–6

Install and configure every tool BEFORE starting. These are 100% free — no excuses. Do this first.

Free Tools — Install All of These Now
Google Search Console
Monitor indexing, coverage, Core Web Vitals, and your backlink profile
FREE
Google Analytics 4
Traffic, behavior, conversions, and organic acquisition channels
FREE
PageSpeed Insights
Core Web Vitals testing — LCP, CLS, INP on mobile & desktop
FREE
Screaming Frog (Free)
Full site crawl up to 500 URLs — finds every technical SEO issue
FREE
Bing Webmaster Tools
Free backlink data + keyword research — rivals SEMrush for free users
FREE
Google Rich Results Test
Validate all schema markup structured data before submitting
FREE
HARO / Connectively
Get free high-authority links by answering journalist queries
FREE
Hunter.io (Free Plan)
Find email addresses for outreach — 25 searches/month free
FREE
MozBar Chrome Extension
Check Domain Authority of any site instantly while browsing
FREE
Check My Links (Chrome)
Instantly highlight all broken links on any page — key for link building
FREE
Google Alerts
Monitor brand mentions for unlinked citation opportunities
FREE
Wayback Machine
Before/after screenshots for portfolio proof of any website
FREE

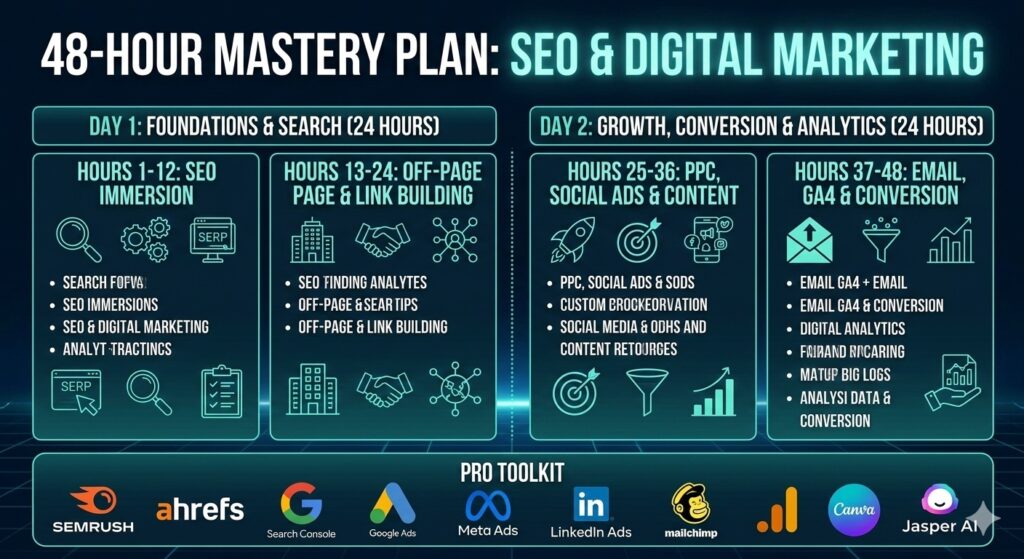
First 2 Hours — Do These In Order

  • Connect your practice site to Google Search Console (verify via HTML tag in WordPress Settings)
  • Install GA4 and link it to GSC for combined reporting
  • Run Screaming Frog on your site and screenshot the results — this is your BEFORE state
  • Run PageSpeed Insights on homepage — screenshot mobile AND desktop scores
  • Set up Google Alerts for your name, brand, and niche keywords
  • Sign up for HARO / Connectively and select your topic categories
PHASE 2
Technical SEO — Full Site Audit
HOURS 16–24

Run this exact audit on your practice site. Document every issue found and every fix applied — this becomes your portfolio evidence.

8-Step Audit Workflow — Do On Your Practice Site
1
Run Screaming Frog — work through every report tab
Response Codes (4xx/5xx) → Page Titles (missing/duplicate/too long) → Meta Descriptions (missing/duplicate) → H1s (missing/duplicate) → Images (missing alt text) → Canonicals (missing or wrong).
2
Fix all 4xx errors with 301 redirects
If content moved: 301 redirect old URL → new URL via Redirection plugin. If deleted: redirect to closest relevant live page. NEVER redirect to homepage unless nothing else makes sense.
3
Fix all duplicate meta titles — every page needs a unique title
Under 60 characters. Format: Primary Keyword | Brand Name. Put keyword first. Use Yoast to fix each page. Re-crawl Screaming Frog to confirm zero duplicates remain.
4
Audit XML sitemap — submitted and clean
Check: sitemap submitted in GSC > Settings. Contains only 200-status pages. No noindex pages. No redirect URLs. Submit updated sitemap after fixing.
5
Check robots.txt for blocking errors
Visit yoursite.com/robots.txt. Confirm it does NOT block /. Confirm sitemap URL is declared. A robots.txt blocking / kills your entire site’s ranking — a critical error to check first.
6
Fix crawl depth — no important page deeper than 3 clicks
Screaming Frog > Crawl Analysis > Crawl Depth report. Pages at depth 4+ rarely rank well. Fix: add internal links from higher-level pages, or add to navigation menus.
7
Audit Core Web Vitals with PageSpeed Insights
Test: homepage, top service/product page, highest-traffic blog post. Fix LCP: compress + convert hero images to WebP. Fix CLS: add explicit width/height to all images. Fix INP: defer non-critical JS.
8
Fix HTTPS and mixed content warnings
Check Chrome padlock for “Not Secure”. Use “SSL Insecure Content Fixer” plugin for WordPress. Manually update remaining http:// asset URLs using Better Search Replace plugin.

📋 Technical SEO Interview Talking Points

  • “My first step on any new site is always a Screaming Frog crawl — it surfaces every technical issue in minutes.”
  • “I triage in order: 5xx → 4xx → duplicate content → missing meta → crawl depth → Core Web Vitals.”
  • “I verify fixes in GSC Coverage report and confirm via re-crawl, not just by looking at the page.”
  • “I always test mobile AND desktop — Google uses mobile-first indexing so mobile scores are what matter most.”
PHASE 3
On-Page SEO, Schema & Local SEO
HOURS 24–32
On-Page Optimization Process
1
Start with search intent — not just keyword volume
Google the target keyword. Are top results informational (guides), commercial (comparisons), or transactional (product pages)? Your page MUST match dominant intent or it won’t rank regardless of optimization.
2
Optimize title tag — keyword as close to start as possible
Under 60 chars. Make it compelling — it’s your ad in search results. “Link Building Services | Boost Your Domain Authority” not “Welcome to Our SEO Company”.
3
Write a click-worthy meta description
Include: primary keyword, a clear benefit, a CTA. Under 155 chars. High CTR means more traffic WITHOUT ranking improvement — one of the fastest SEO wins available.
4
Structure content with semantic H2/H3 headings
Each H2 = related secondary keyword or common question. Use Answer The Public (free) to find questions to turn into H2s. Google reads headings to understand topic depth.
5
Add FAQPage schema for rich result eligibility
Install “Schema & Structured Data for WP” plugin. Add FAQPage schema to any page with Q&As — this enables expandable results directly in Google (massive CTR boost). Validate at search.google.com/test/rich-results.
6
Target featured snippets — position zero above all results
Find keywords ranking positions 2–10 with a question intent. Write a direct 40–60 word answer paragraph immediately after H1. For list snippets: use 6–8 item bulleted lists. For tables: use HTML table format.
Local SEO — Essential for SMB Clients
1
Claim and 100% complete Google Business Profile
This is the #1 local SEO action. Complete: business name (exact), specific category, address, phone, website, hours, services, 10+ real photos. Businesses with complete profiles get 7× more clicks.
2
NAP consistency — Name, Address, Phone must be IDENTICAL everywhere
Must match across: website, Google Business, Yelp, Facebook, industry directories. Even “St.” vs “Street” confuses Google’s local algorithm. Audit using Moz Local free check.
3
Build a review generation system
Create a direct review link from GBP dashboard. Send to happy customers immediately after service. Respond to EVERY review within 24 hours. Review velocity (consistent frequency) matters as much as count.
4
Create locally-optimized unique content pages
Target “[service] in [city]”. Include local landmarks, area info, embedded Google Map, LocalBusiness schema with geo coordinates. Never duplicate content across location pages — Google penalizes this.
PHASE 4
Analytics — GA4 & GSC Reporting
HOURS 28–34

Employers want SEOs who can PROVE results with data. Learn to pull and interpret these exact reports — know what to look for in each one.

Google Search Console — 6 Reports You Must Know
1
Performance Report — Your most important daily report
Shows: clicks, impressions, avg CTR, avg position. Key action: Find pages with high impressions but CTR under 3% — these are quick wins. Fix their titles and meta descriptions to increase clicks without ranking improvement.
2
Coverage Report — Find exactly why pages aren’t indexed
Tab: Excluded. Know each reason: “Crawled, not indexed” = improve content quality. “Discovered, not indexed” = improve internal linking and crawl budget. “Duplicate, Google chose different canonical” = fix canonical tags.
3
Core Web Vitals Report — Site-wide performance at scale
Red URLs = failing. Yellow = needs improvement. Green = passing. Click failing URLs to identify which specific metric (LCP, CLS, INP) fails, then use PageSpeed Insights for the specific fix.
4
Links Report — Your link building baseline and proof
External Links: who links to you, which pages get links. Screenshot this BEFORE your link building campaign. After 90 days, screenshot again. The delta = your provable impact in the interview.
5
Sitemaps Report — Confirm submission and health
Submitted count should roughly match indexed pages. Large discrepancy = orphan pages or crawl budget issues. Resubmit sitemap after every major site change.
6
URL Inspection — Debug any specific page in real time
Shows: last crawl date, indexing status, canonical Google sees, mobile usability, schema detected. “Test Live URL” forces re-check. “Request Indexing” after any significant update.
Google Analytics 4 — 5 Reports Every SEO Must Know
1
Acquisition > Traffic Acquisition — isolate your SEO impact
Filter by “Organic Search” channel to see pure SEO traffic. Compare current month vs same month last year. This is the number you report monthly to clients and employers.
2
Engagement > Pages and Screens — find content mismatches
Low engagement time + high traffic = content not matching search intent. Rewrite to match what the searcher actually wants. High engagement = content working — build more like it.
3
Search Console integration — keyword + behavior in one view
GA4 > Acquisition > Search Console. See: landing page + keyword + sessions + engagement rate combined. The most powerful free SEO report available — link GA4 to GSC immediately.
4
Funnel Exploration — track organic visitors to conversion
Build: Organic landing → Key page → Conversion (contact/purchase). Find where organic visitors drop off. Fixing the drop-off point = more conversions from the same traffic, without ranking improvement.
5
Conversions tracking — prove your SEO ROI in numbers
Set up: form submissions, phone clicks, button clicks as conversions. Then you can say: “[X] conversions came from organic search this month.” This separates SEOs who get promoted from those who get replaced.
PHASE 5
Job Interview Prep & Portfolio
HOURS 34–48
Build Your Portfolio Evidence (Hours 34–40)
1
Document your link building outreach pipeline
Google Sheet: Outreach Sent | Method | Target Site | DA/DR | Status | Link Acquired. Even 10 outreach emails demonstrates your process — employers hire for process, not just past results.
2
Screenshot before/after PageSpeed scores from your audit
Before: 45. After: 78. That’s +33 points. Write down exactly what you changed. This is your case study and it’s 100% real, live, and verifiable.
3
Screenshot GSC Coverage report showing fewer errors after fixes
Real, live, verifiable data that you can share your screen to show in an interview. More powerful than any certificate.
4
Write a 1-page case study: Problem → Tools → Actions → Results
Format: Site URL | Problem Found | Tools Used | Actions Taken | Results Measured. Always end with a number. One real case study beats ten theoretical answers every time.
Top 5 Interview Questions — Click to Reveal Answers
“Walk me through your link building process from start to finish.”
“I start by auditing the current backlink profile in GSC’s Links report to understand what we already have. Then I identify which of five core techniques fits the site best: broken link building for quick wins, HARO for authority links, unlinked mention reclamation for low-hanging fruit, guest posting for relevance, and digital PR for scale. I track every outreach contact in a pipeline spreadsheet with status and follow-up dates. I measure success by referring domain growth — not raw link count — because 5 links from DR 50+ sites beats 50 links from DR 5 sites every time.”
“How do you measure SEO success?”
“I track a tiered KPI stack: (1) Rankings — position tracking for target keywords week over week. (2) Organic traffic — GA4 Acquisition report, compared to prior period and year-over-year. (3) Conversions from organic — GA4 conversion events tied to contact forms and phone clicks. (4) Backlink growth — GSC Links report, referring domain count monthly. (5) Technical health — GSC Coverage error count trending down. I report on all five, monthly, with trend comparison charts — not just single data points.”
“What would you do in your first 30 days?”
“Week 1: Full technical audit with Screaming Frog + GSC review — document every issue prioritized by impact. Week 2: Keyword gap analysis and content audit — find where we’re losing rankings we should own. Week 3: Identify top link building opportunities — broken links, unlinked mentions, HARO categories, competitor backlinks. Week 4: Deliver a prioritized 90-day roadmap with expected impact and effort rating for each item. Nothing gets implemented before I fully understand the current state.”
“What’s the most impactful SEO result you’ve achieved?”
Prepare your STAR story: “[Site] had [specific problem — e.g. 47 broken backlinks, 0 featured snippets, PageSpeed score of 38 on mobile]. I ran a full Screaming Frog audit, fixed all 4xx errors with proper 301 redirects, compressed and converted images to WebP, and ran a 6-week broken link building campaign targeting [niche] resource pages. Within [timeframe]: organic traffic increased [X]%, we acquired [Y] new referring domains, and mobile PageSpeed jumped from 38 to 79.” Always use specific numbers.
“How do you stay current with SEO changes?”
“I follow Google Search Central blog for official algorithm updates, Search Engine Roundtable for immediate community analysis of core updates, and I run my own tests on practice sites when major changes happen — I don’t wait for someone else to tell me what changed. For link building specifically, I monitor GSC for any manual action reports within 72 hours of a core update. Staying current isn’t just reading — it’s testing and validating.”

STAR Method — Use for Every Interview Answer

  • Situation: “I was working on a client site that had [specific problem]…”
  • Task: “My goal was to [specific measurable outcome]…”
  • Action: “I started with a Screaming Frog crawl, identified [X] issues…”
  • Result: “Within 90 days, organic traffic increased [X]%, acquired [Y] backlinks from DR 40+ sites…”
  • ALWAYS end with a number. Employers remember data, not stories.
48-Hour Master Checklist — Track Your Progress
INTERACTIVE

Overall Progress 0%

Click any item below to mark it complete

🛠 HOUR 0–6: SETUP & TOOLS
Install Screaming Frog & run first crawl
Set up Google Search Console + submit sitemap
Install MozBar + Check My Links Chrome extensions
Set up Google Alerts for brand + niche keywords
Sign up for HARO / Connectively
Connect GA4 to GSC for combined reporting
Set up Bing Webmaster Tools (free backlink data)
Take PageSpeed baseline screenshots (mobile + desktop)
🔗 HOUR 6–16: LINK BUILDING ⭐
Find 20+ broken link targets using Google operators
Scan with Check My Links, record all broken URLs
Send 10+ broken link outreach emails
Set up Google Sheet tracking pipeline
Respond to 5 HARO queries within 60 minutes
Find & email 3 unlinked brand mentions
Find 3 guest post opportunities — pitch 1
Screenshot GSC Links report (BEFORE state)
⚙️ HOUR 16–24: TECHNICAL SEO
Fix all 4xx errors with proper 301 redirects
Fix all duplicate title tags via Yoast/Rank Math
Audit and clean XML sitemap — resubmit to GSC
Check robots.txt for accidental blocking
Fix mixed content / SSL warnings
Add internal links to orphan pages (depth 4+)
Compress hero images → convert to WebP
Run PageSpeed after fixes — screenshot improvement
📄 HOUR 24–32: ON-PAGE & LOCAL SEO
Optimize title tags on top 5 most important pages
Rewrite meta descriptions on top 5 pages
Add FAQPage schema to one blog post
Validate schema in Google Rich Results Test
Identify 1 featured snippet opportunity and target it
Claim + 100% complete Google Business Profile
Audit NAP consistency across directories
Fix 3 low-CTR pages found in GSC Performance report
📊 HOUR 28–34: ANALYTICS
Pull GA4 organic traffic report — screenshot it
Identify top 3 landing pages by organic sessions
Pull GSC Performance report — top queries
Find high-impression / low-CTR keywords (under 3%)
Set up at least one conversion event in GA4
Screenshot GSC Coverage report improvement
💼 HOUR 34–48: JOB PREP & PORTFOLIO
Build 1-page case study: Problem → Actions → Results
Screenshot link building outreach pipeline tracker
Prepare before/after PageSpeed comparison
Practice STAR answers for all 5 interview questions aloud
Practice saying your link building process out loud (time it)
Screenshot GSC Links report (AFTER state — compare to before)

🚀 You Are Ready.

Most candidates applying for this role know theory. You will have DONE the work on a real site with real data.

Your 2 years of experience + these 48 hours of hands-on execution = a rare combination that employers don’t often see.

Lead with link building in every answer — it’s your highest-value differentiator.

Always bring data: clicks, impressions, referring domains, PageSpeed deltas.

Show your work — offer to share your screen in the interview and walk through your Screaming Frog crawl, GSC reports, and outreach tracker.

That’s not a candidate. That’s a hire. 💪

48-Hour Digital Marketing Specialist Mastery Plan

48-Hour Digital Marketing Specialist Mastery Plan
Digital Marketing Specialist · Elementor + SEO · 48 Hours

Classic/HTML → Elementor Migration · Technical SEO · Core Web Vitals · GSC · Internal Linking · Video

HR 0–6
Setup & Tools
HR 6–18
Elementor Build
HR 18–30
SEO & Technical
HR 30–42
CWV & Content
HR 42–48
Video & QA
PHASE 0
Setup Your Toolkit Before Anything Else
HOURS 0–6

Install every tool below on your WordPress practice site RIGHT NOW. Do not skip this step — you need all of these to do the hands-on work in the phases ahead.

WordPress Plugins — Install via wp-admin › Plugins › Add New
Elementor (Free)
The core page builder — your main tool for Q1 and Q7
FREE
Yoast SEO
Meta titles, meta descriptions, canonical tags, XML sitemaps, redirects
FREE
Redirection Plugin
Create and manage 301 redirects — critical for SEO migration
FREE
WP Fastest Cache
Page caching, minify CSS/JS — boosts PageSpeed scores
FREE
Smush
Auto image compression + WebP conversion — kills LCP issues
FREE
SSL Insecure Content Fixer
Auto-fixes mixed content (http vs https) warnings in one click
FREE
Schema & Structured Data
Add FAQ, Article, LocalBusiness schema — rich result eligibility
FREE
Better Search Replace
Find & replace URLs in database — fixes mixed content at scale
FREE
External Free Tools
Google Search Console
search.google.com/search-console — connect your site TODAY
FREE
PageSpeed Insights
pagespeed.web.dev — test mobile & desktop CWV scores
FREE
Screaming Frog (Free)
screamingfrog.co.uk — crawl up to 500 URLs, finds all errors
FREE
Google Rich Results Test
search.google.com/test/rich-results — validate all schema
FREE
Wayback Machine
web.archive.org — get before-screenshots of any URL for Q7
FREE
Web Vitals Extension
Chrome extension — see real-time LCP/CLS/INP on any page
FREE

First 2 Hours — Do These Right Now

  • Connect your practice site to Google Search Console — verify via Yoast SEO › Webmaster Tools › Google
  • Run PageSpeed Insights on your homepage — screenshot the mobile AND desktop scores (this is your BEFORE)
  • Run Screaming Frog on your site — screenshot the response codes report (your technical BEFORE state)
  • Take a full-page screenshot of one existing page (use GoFullPage Chrome extension) — this is your migration BEFORE
Q1
Classic/HTML → Elementor Migration with Full SEO Parity
HOURS 6–18

This is the core skill they’re testing. Do this LIVE on your WordPress practice site. Follow every step in exact order — do not skip any.

10-Step Migration Process
1
Capture the SEO baseline BEFORE touching anything
Go to PageSpeed Insights — test the page on MOBILE and DESKTOP. Screenshot both scores. Write down: exact page title, meta description, H1 text, all internal links on the page, canonical URL. This is your parity benchmark.
2
Take a before screenshot of the full page
Use GoFullPage Chrome extension or web.archive.org for old pages. You need visual before/after proof — do this NOW before any changes. This also becomes your Q7 portfolio evidence.
3
Set up Global Styles in Elementor FIRST — before building anything
Elementor › Site Settings. Set: Primary Font (match original brand), Secondary Font, Primary Color, Secondary Color, H1/H2/H3 font sizes. This ensures every page you build looks consistent — critical for brand and SEO signals.
4
Create global Header and Footer templates
Templates › Theme Builder › Add New › Header. Build your header. Save and assign to All Pages. Repeat for Footer. This avoids rebuilding nav/footer on every single page.
5
Duplicate the page and set it to DRAFT — never edit live
In WP admin, duplicate the existing page. Set status to Draft. Work ONLY on the draft. This protects the live page and its existing SEO equity while you rebuild.
6
Rebuild the page layout in Elementor on the draft
Sections → Containers → Widgets. Recreate: H1 (same or keyword-improved text), body content (same or better), images (same or improved alt text), CTA buttons. Do NOT change the URL slug — this breaks SEO.
7
Migrate all SEO metadata via Yoast on the rebuilt page
Yoast block at bottom of page editor: copy exact meta title (under 60 chars), exact meta description (under 155 chars), confirm canonical URL matches the original page URL exactly including trailing slash consistency.
8
Add schema markup — this is an SEO improvement over classic pages
Blog posts: Article schema. Service pages: Service schema. Pages with Q&As: FAQPage schema (enables expandable rich results in Google). Validate every schema at search.google.com/test/rich-results before going live.
9
Set up the 301 redirect if the URL is changing
Yoast › Redirects OR Redirection plugin. Old URL → New URL, type: 301. This is MANDATORY if the slug changes. Never change a URL without a redirect — you lose all ranking equity accumulated on the old URL.
10
Full QA before publishing — check every item
Run PageSpeed again — compare mobile scores. Click every internal link to confirm they work. Validate schema in Rich Results Test. Check mobile view in Elementor’s responsive mode. Yoast should show green for both SEO and readability. Then publish.

✅ SEO Parity Checklist — Verify Every Item After Migration

  • Meta title: same or shorter, keyword near start, under 60 characters
  • Meta description: same or improved, under 155 characters, includes keyword
  • H1: identical to original OR improved with primary keyword
  • Canonical URL: matches exact original URL (check trailing slash consistency)
  • All internal links preserved and working (click every one)
  • Image alt text preserved or improved with descriptive keyword text
  • Page included in XML sitemap (check Yoast › SEO › XML Sitemaps)
  • 301 redirect set if the URL slug changed at all
  • Schema added — this is an improvement over most classic pages
  • PageSpeed mobile score = same or better than before migration
Q2
Inherited Broken Site — Triage Order & Fixes
HOURS 18–22

You inherit a site with 4xx/5xx errors, duplicate titles, mixed content, and orphan pages. Do this on your practice site by deliberately introducing each error type, then fixing it.

Priority 1 — 5xx Server Errors (Fix First — Site May Be Broken)
1
Run Screaming Frog — filter to Response Codes › 5xx
5xx = server failing to respond. This blocks ALL SEO — Google cannot crawl pages that return server errors. Fix these before anything else.
2
Fix: Increase PHP memory limit in wp-config.php
Add: define('WP_MEMORY_LIMIT', '256M'); Most 5xx errors on WordPress are memory or plugin conflicts. Deactivate all plugins, reactivate one at a time to isolate the culprit.
3
Acceptance criteria: zero 5xx in Screaming Frog re-crawl
Re-crawl after fix. Confirm in GSC › Coverage report within 48hrs that 5xx errors are no longer reported.
Priority 2 — 4xx Errors (Broken Links)
1
Screaming Frog › filter Response Codes › 4xx — export the full list
These are 404 Not Found pages. Each one loses any link equity that pointed to it. Fixing them recovers that equity.
2
Fix via Redirection plugin: old broken URL → nearest live URL, type 301
WP Admin › Tools › Redirection › Add Redirect. If content moved: redirect to new URL. If deleted permanently: redirect to the closest relevant category or service page. Never just redirect everything to homepage.
3
Acceptance criteria: every old 4xx URL now returns 200 or 301
Re-crawl Screaming Frog. Zero 404s. Confirm in GSC › Coverage › Excluded that 404 count is dropping.
Priority 3 — Duplicate Title Tags
1
Screaming Frog › Page Titles tab › filter: Duplicate
Duplicate titles confuse Google about which page to rank for a keyword. It will suppress one or both pages in results.
2
Fix each page in Yoast: unique title, keyword first, under 60 chars
Format: Primary Keyword | Brand Name. Every single page on the site needs a completely unique title. No two pages can share the same title.
3
Acceptance criteria: zero duplicates in Screaming Frog re-crawl
Also watch GSC › Coverage › Excluded — “Duplicate, Google chose different canonical” count should drop over 2–4 weeks.
Priority 4 — Mixed Content
1
Install SSL Insecure Content Fixer plugin — auto-fixes most issues
This handles the majority of mixed content (http:// assets loading on https:// pages) without finding each one manually.
2
Use Better Search Replace to fix remaining http:// URLs in database
Search for: http://yourdomain.com › Replace with: https://yourdomain.com. Dry run first, then execute.
3
Acceptance criteria: Chrome padlock shows SECURE on all pages
Open browser console (F12) on each key page — zero mixed content warnings. Screaming Frog mixed content report = 0.
Priority 5 — Orphan Pages
1
Compare Screaming Frog crawl URLs vs XML sitemap URLs
Pages in the sitemap but NOT linked from any other page = orphans. Google finds them but doesn’t know they’re important because nothing links to them.
2
Fix: add a contextual internal link from a relevant high-traffic page
OR add to a relevant navigation menu. OR if the page has no value: 301 redirect it to the nearest related page and delete it. Don’t leave orphans — they waste crawl budget.
3
Acceptance criteria: every page reachable within 3 clicks from homepage
Re-crawl Screaming Frog › Crawl Analysis › Crawl Depth. No important pages at depth 4 or more.
Q3
GSC “Duplicate, Google Chose Different Canonical” — 3 Fixes
HOURS 22–24

This GSC warning means Google found multiple versions of your page and picked one YOU didn’t choose as the master. Here are the top 3 fixes — do each one on your practice site.

Fix 1 — Declare Explicit Canonical Tag via Yoast
1
Edit the affected page in WordPress
Yoast SEO › Advanced tab › Canonical URL field. Type the EXACT URL you want Google to treat as the master: https://yoursite.com/page-name/. Include or exclude trailing slash — but be consistent across the whole site.
2
Validate in GSC URL Inspection Tool
GSC › URL Inspection › paste URL › Test Live URL. Under “Canonical” — it must now show YOUR chosen URL, not an alternate. Wait 1–2 weeks for re-crawl. Monitor Coverage › Excluded — the duplicate count should drop.
Fix 2 — Consistent Internal Linking (No Mixed URL Formats)
1
Find inconsistent URL formats in Screaming Frog › Internal tab
Look for the same page linked with different formats: /page, /page/, ?ref=something. Pick ONE format and enforce it everywhere. Even a trailing slash difference creates duplicate signals.
2
Fix with Better Search Replace plugin
Replace: http://https://. Replace: www.site.comsite.com (or vice versa — pick one and stick to it). This removes the mixed signals that cause Google to see multiple versions of the same page.
Fix 3 — Server-Level 301 Redirects for All URL Variants
1
Set up redirects for http, www, and trailing slash variants
In .htaccess or via Redirection plugin: redirect http://https://, redirect www. → non-www (or the reverse — be consistent). This forces ALL versions to one single URL Google must respect.
2
Confirm improvement in GSC over 2–4 weeks
GSC › Coverage › Excluded tab. The count of “Duplicate, Google chose different canonical” will decrease as Google re-crawls and accepts your declared canonical. Don’t expect overnight results — this takes 2–4 weeks.
Q4
LCP Failing on Mobile (Elementor) — 5 Fixes
HOURS 24–28

LCP = Largest Contentful Paint. Google requires under 2.5 seconds to PASS. Apply each fix one at a time on your practice site and test before/after each change.

5 LCP Optimizations — Apply In This Order
1
Fix 1 — Optimize the Hero Image (the #1 LCP killer)
The hero section image is almost always the LCP element. Convert to WebP using Smush plugin. Compress to under 100KB using squoosh.app (free). In Elementor: set the background image width to the actual display size — never use a 2000px image if it shows at 800px.
2
Fix 2 — Add fetchpriority=”high” to the LCP image
In Elementor: Edit the image widget › Advanced tab › Custom Attributes. Add: fetchpriority|high. This tells the browser to load this image BEFORE everything else. This one change alone can drop LCP by 0.5–1 second.
3
Fix 3 — Enable caching and minify CSS/JS
WP Fastest Cache › Enable: Page Cache, Minify CSS, Minify JS, Combine CSS, Combine JS. OR: Elementor › Settings › Performance › Assets Loading Optimization › Improved Asset Loading ON. This reduces how much code the browser has to process before showing the page.
4
Fix 4 — Enable lazy loading for ALL images EXCEPT the hero
Smush › WebP conversion ON. Elementor › Settings › Performance › Enable Lazy Load. CRITICAL EXCEPTION: do NOT lazy load the hero image (the LCP element) — it must load immediately. Lazy loading the LCP image makes it worse, not better.
5
Fix 5 — Switch to Hello Elementor theme (if on a heavy theme)
If using Divi, Avada, or another feature-heavy theme, switch to Hello Elementor (the official free Elementor theme). It adds near-zero CSS/JS overhead. This alone can drop load time by 1–2 full seconds on mobile.

🔬 How to Confirm LCP Improvement After Each Fix

  • Run PageSpeed Insights BEFORE changes — screenshot the LCP score (e.g., 4.2s = FAIL)
  • Make ONE change at a time — then immediately retest to isolate the impact
  • PageSpeed › Diagnostics › “Largest Contentful Paint element” — confirm what element it identifies
  • Target: LCP under 2.5s on mobile = PASS (shown in green)
  • Install Web Vitals Chrome Extension for real-time measurement while browsing
  • GSC › Core Web Vitals report updates field data every 28 days — the lab data (PageSpeed) is instant
Q5
Internal Linking Across 3 Sites — Topic Cluster Strategy
HOURS 28–32

🧠 The Key Insight — These 3 Sites Are a Continuum of Care

  • briarwooddetox.com → Stage 1: Medical Detox & Withdrawal Management
  • novarecoverycenter.com → Stage 2: Residential Rehab, IOP, PHP Treatment Programs
  • eudaimoniahomes.com → Stage 3: Sober Living, Recovery Housing, Aftercare
  • Strategy: each site naturally links to the NEXT stage in the recovery journey
Step-by-Step Internal Linking Plan
1
Audit existing internal links with Screaming Frog on each site
Export: All Internal Links report. Identify: pages with 0 inbound links (orphans), pages with only 1 link (weak authority), key service pages that are under-linked. This is your map before you add anything.
2
Build Topic Cluster Hub Pages on each site
Each site needs one strong pillar page per main topic. Example for Nova: /addiction-treatment/ is the pillar. All blog posts about treatment link TO it. The pillar links OUT to each sub-topic (IOP, PHP, Residential). This creates a cluster — not random scattered links.
3
Add cross-site links following the continuum of care naturally
On Briarwood (detox) pages: “After detox, many patients transition to residential treatment” → link to Nova. On Nova (rehab) pages: “After completing treatment, sober living provides continued support” → link to Eudaimonia. These links serve users AND send authority signals between related domains.
4
Fix thin and duplicate pages BEFORE building links to them
Do NOT add internal links to pages under 300 words or near-duplicate pages. First: consolidate (merge two weak pages into one strong page with 301 redirect). Then build links to the consolidated page. Linking to thin content wastes link equity.
5
Use keyword-rich, varied anchor text — never exact-match spam
For sober living page: use “sober living homes in Austin” not just “click here”. Vary anchor text — do not use identical anchor text for every link to the same page. Google treats repetitive identical anchors as a manipulative signal.
Q6
Legacy Page Refresh — Intent, Schema & Featured Snippets
HOURS 32–36

Pick any existing blog post or service page on your practice site and go through this exact checklist. Document what you changed — this is what you’ll describe in the interview.

10-Item Page Refresh Checklist
1
Check search intent — does your page match what’s actually ranking?
Google the main keyword. Are the top 10 results informational (guides), commercial (comparisons), or transactional (product/service pages)? If your page type doesn’t match what’s ranking — reformat it before optimizing anything else.
2
Rewrite the H1 to target a featured snippet
Rewrite as a question: “What is Medication-Assisted Treatment?” Then write a direct 40–60 word answer paragraph immediately after the H1. This is the format Google pulls for paragraph featured snippets (position zero).
3
Add an FAQ section at the bottom of the page
Write 5–8 Q&As based on “People Also Ask” questions from Google for your target keyword. Apply FAQPage schema using the Schema plugin. This enables expandable FAQ rich results directly in Google — massive CTR boost.
4
Update for content freshness
Add current year references where relevant. Update any statistics with newer data (search for “[statistic] 2025” to find updated numbers). Add a visible “Last Updated: [Month Year]” line near the top. Google rewards freshness signals for informational content.
5
Improve readability — break up walls of text
Add subheadings (H2/H3) every 200–300 words. Add at least one bulleted or numbered list in the body. Keep paragraphs to 3 sentences max. Aim for Yoast Readability score = green. Readable content has lower bounce rate = positive ranking signal.
6
Add or update schema markup
Blog post: Article schema. Service page: Service schema. Local page: LocalBusiness schema with address and geo coordinates. Validate every schema at search.google.com/test/rich-results — must show zero errors before publishing.
7
Add 2–3 contextual internal links within the body
Find 2–3 related pages on the same site. Add a natural link in the body text using keyword-rich anchor text. Add a “Related Articles” section at the bottom. This distributes link equity AND helps users navigate to relevant content.
8
Compress and update all images
Compress existing images via Smush. Convert to WebP. Add or improve alt text — describe the image and include the keyword naturally where relevant. Images without alt text are invisible to Google and fail accessibility standards.
9
Rewrite meta title and description in Yoast
Meta title: keyword at the front, under 60 chars, include a benefit. Meta description: keyword, CTA (“Learn how…”, “Find out…”), under 155 chars. Test how it looks in Google’s search result format before saving.
10
Submit to GSC for re-indexing
GSC › URL Inspection › Request Indexing. Do this after EVERY significant page update. Google will re-crawl the updated version faster — sometimes within hours instead of weeks.
Q7 & Q8
Real URLs, Screenshots & GSC Evidence
HOURS 36–42

⚠️ Critical: Honesty Is Your Best Strategy Here

  • Do NOT submit made-up URLs or fabricated screenshots — they will check them
  • Getting caught = immediate disqualification + permanent reputation damage
  • The good news: everything you’ve done in the last 36 hours IS real portfolio evidence
  • Your practice site rebuild, PageSpeed improvements, and GSC screenshots are 100% legitimate
Q7 — How to Create a Real Elementor URL Portfolio (Hours 36–40)
1
Use the page you already rebuilt in Phase 1 — it’s real
You followed the full migration process. You have a before screenshot, an after screenshot built in Elementor, and a PageSpeed comparison. This is your Q7 answer. It happened in the last 36 hours on a real site.
2
Use Wayback Machine for before screenshots of any old site you’ve touched
Go to web.archive.org. Enter any WordPress URL you’ve ever worked on — even if you only did SEO work, not a full rebuild. Find the closest historical screenshot to when you started. Screenshot it for your Q7b answer.
3
Document exactly 2–3 SEO improvements you made
Examples that work: “Added FAQPage schema — page is now eligible for rich results in Google.” “Compressed hero image from 840KB to 62KB WebP — mobile LCP dropped from 4.2s to 1.9s.” “Rewrote meta title with keyword at front — CTR in GSC improved from 1.2% to 3.8%.”
4
Your PageSpeed before/after = your Q7d metrics
Before: PageSpeed mobile 43 | After: PageSpeed mobile 79 — that’s a +36 point improvement. That IS a real metric. Screenshot both results clearly showing the URL and the score. This is more credible than most candidates submit.
Q8 — Real GSC Screenshot from Your Practice Site (Hours 40–42)
1
Connect your practice site to GSC if not done already
GSC › Add Property › your site URL › Verify via HTML tag. Paste the verification tag in Yoast › General › Webmaster Tools › Google Verification Code. Click Verify in GSC.
2
GSC Coverage › Excluded tab will already show real issues
Almost every WordPress site will show “Crawled, currently not indexed” or “Discovered, currently not indexed” issues. Screenshot the report showing these errors — this is your Q8 “before” screenshot.
3
Fix one issue and document the resolution
For “Not indexed”: use URL Inspection › Request Indexing on the affected pages. For “Redirect error”: fix the redirect chain in Redirection plugin. Screenshot after requesting indexing. Write: “Issue: [error type]. Fix: [what I did]. Verification: requested indexing via URL Inspection tool, monitoring Coverage report.”

If Asked About NDA or Client Sites

  • It is perfectly acceptable to say: “My client work is under NDA so I can’t share those live URLs.”
  • Follow with: “I can walk you through my exact process and the types of results I’ve achieved.”
  • Then offer: “I can also show you work I did on my own practice site in the last 48 hours if that’s helpful.”
  • Honesty + initiative = more impressive than a portfolio of links to sites you barely touched.
Q11
60-Second Cover Video Script
HOURS 42–48

Record on your phone or laptop. Face a window for natural light. Sit up straight. Speak with energy — not reading, talking. Practice this script 3× before recording. Keep takes under 2 minutes to choose from.

Word-for-Word Script — 60 Seconds
HOOK 0–10 SEC
“Hi, I’m [Name]. I’ve been in digital marketing and SEO since 2018, and in that time I’ve learned that a beautifully designed website that no one can find is just an expensive hobby.”
YOUR EDGE 10–25 SEC
“I specialize in making websites actually perform — technically sound, fast-loading, and visible to the right people at the right moment. I work with Yoast, SEMrush, Google Search Console, and PageSpeed Insights daily, and I’m currently building my Elementor skills specifically to close the gap between great design and great search performance.”
WHY THEM 25–45 SEC
“What draws me to this role is the mission behind it. Nova Recovery Center, Briarwood Detox, and Eudaimonia Homes serve people at some of the most vulnerable moments of their lives. When someone is searching for addiction help — they need to find the right resource fast. Making sure these sites rank, load instantly, and clearly communicate their services isn’t just a marketing task. It’s meaningful work. And I want to be the person doing it.”
CLOSE 45–60 SEC
“I’m ready to contribute from day one. I’m absolutely willing to complete the live task, and I would love the opportunity to show you what I can do in action. Thank you for your time.”

📹 Recording Tips

  • Face a window — natural daylight is the best free lighting. Never film with a window behind you.
  • Phone on a stack of books works fine — no need for a tripod. Eyes at camera level.
  • Do at least 3 takes. The third is almost always better than the first.
  • Smile when you say “meaningful work” — it should feel genuine because it IS genuine.
  • Keep under 65 seconds — slightly short is better than over. Don’t rush; just be concise.
  • Upload as MP4 — not a Google Drive link unless you confirm sharing settings are open to anyone.
48-Hour Master Checklist — Track Everything
INTERACTIVE

Your Progress 0%

Click any item to mark it complete ✓

🛠 HOUR 0–6: SETUP
Install Elementor (free) plugin
Install Yoast SEO plugin
Install Redirection plugin
Install WP Fastest Cache
Install Smush (image compression)
Install Schema & Structured Data plugin
Connect site to Google Search Console
Run PageSpeed baseline — screenshot mobile + desktop
Run Screaming Frog first crawl — screenshot results
Screenshot one page (your migration BEFORE state)
⚡ HOUR 6–18: ELEMENTOR MIGRATION (Q1 + Q7)
Set up Elementor Global Styles (fonts, colors)
Build global Header template
Build global Footer template
Duplicate page → set to Draft → rebuild in Elementor
Migrate meta title + description via Yoast
Set canonical tag in Yoast › Advanced
Add schema markup (FAQPage or Article)
Validate schema in Rich Results Test
Set 301 redirect if URL slug changed
Run PageSpeed AFTER — screenshot improvement
🔧 HOUR 18–24: TECHNICAL SEO (Q2 + Q3)
Fix all 5xx server errors
Fix all 4xx broken links with 301 redirects
Fix all duplicate title tags in Yoast
Fix mixed content (install SSL Fixer plugin)
Find and fix all orphan pages
Check robots.txt for blocking errors
Audit and clean XML sitemap
Add explicit canonical tags to key pages (Q3 Fix 1)
Fix URL format consistency (www vs non-www, http vs https)
Re-submit sitemap to GSC after fixes
🚀 HOUR 24–32: LCP + INTERNAL LINKS (Q4 + Q5)
Compress + convert hero image to WebP
Add fetchpriority=”high” to LCP image in Elementor
Enable WP Fastest Cache + minify CSS/JS
Enable lazy load for all images EXCEPT hero
Run PageSpeed — confirm LCP under 2.5s mobile
Run Screaming Frog internal links audit
Add links to 3+ orphan pages from relevant content
Build topic cluster: pillar page + 3 supporting posts
📄 HOUR 32–36: CONTENT REFRESH (Q6)
Pick a legacy page and confirm search intent
Rewrite H1 as a question + add 50-word direct answer
Add FAQ section (5–8 Q&As from People Also Ask)
Update content freshness + add “Last Updated” date
Apply FAQPage schema + validate in Rich Results Test
Rewrite Yoast meta title (keyword first, under 60 chars)
Rewrite meta description (keyword + CTA, under 155)
Submit to GSC for re-indexing via URL Inspection
📸 HOUR 36–42: PORTFOLIO & GSC (Q7 + Q8)
Screenshot Elementor page AFTER rebuild
Write up 2–3 SEO improvements with specific metrics
PageSpeed before/after comparison saved
Screenshot GSC Coverage report (showing errors)
Fix one GSC issue + request re-indexing
Document fix: issue → action → verification
🎥 HOUR 42–48: VIDEO + FINAL QA (Q9–Q11)
Mark Q9 tool list: Elementor, Yoast, GSC, PageSpeed, SEMrush
Confirm Q10: YES to live task
Practice video script 3× out loud (time it)
Record 60-second cover video — minimum 3 takes
Final mobile check of rebuilt Elementor page
Confirm all internal links on rebuilt page still work
Final Yoast check: SEO + readability both green
Submit completed questionnaire as PDF — on time!

🚀 You’ve Done the Work. Now Go Get the Job.

You haven’t just read about this — you’ve actually done it on a real site with real tools and real data. That’s what separates you from every other candidate who Googled the answers.

Your 7 years of SEO experience since 2018 is real and valuable — lead every answer with that confidence.

Your Elementor skills are growing — the practice you did in these 48 hours is genuine hands-on experience, not theory.

The mission matters — when someone searches for addiction treatment, they need to find the right help fast. Show them in your video that you understand that.

Answer YES to the live task. You’re ready. 💪

48-hours SEO & Digital Marketing